
This tutorial is a step by step pictorial class on how to make one of these wooden reindeer pull toys. There are a lot of pictures in order to do this, so please excuse any long loading times you may experience.

Materials

- Large 5" wooden egg
- Small 2" wooden egg
- 1 3/8" by 1 1/4" wooden split eggs
- 7/8" by 1 1/4" wooden split eggs
- 1 1/4" by 7/16" wooden toy wheels
- wooden doll pin stands
- animal doll eyes brown
- 3/4" by 1" wooden candle cups
- 3 1/2" by 7/8" wooden shaker pins
- small metal screw eyelets.
- plastic flexible tongs or pasta spoon
- 1/4" wooden dowel
- Some small gauge bendable wire

Small metal screw eyelets. Used to attach the axles.

Large 5" wooden egg used for the body

Small wooden egg will become the head

Toy wooden wheels

plastic animal eyes

Small wooden split egg will be used to make the ears

Wooden shaker pins will be used to fashion the legs

Wooden candle cups will be used to make the hoofs

Plastic tongs will be used to create the antlers

Large wooden split egg will be used for the tail

Wooden dowel will be used for the axles and to attach the head
This is an easy project making a all wooden keepsake Rudolf Pull Toy, with the use of some electric tools. I may say a little experience with the use of tools will be required unless you have some one who could do it for you.

- Saber or electric jig saw
- Handheld belt sander
- Hand Dremel with assorted bits, and sanding drum bit.
- Power drill with assorted sizes of bits
- Marker
- Adhesive glue
- Small hand saw

I am going to use Christmas berries for the tips of his antlers and nose. and a small red bow, with a leather strip with small jingles on it for a collar.
Step by step directions
Step by step directions

Tape your marker to a small 1/2" wood piece

Laying the large wooden egg on your work surface, using the marker with its guide to trace a line around the egg

It will give you something like this, now turn the egg over and repeat the same step on the other side.

Using the belt sander to sand down flat to each line.

You will end up with this shape center section of the egg.

Using the marker, draw a line similar to this.

Then using the sander to sand flat down to the line.

You can use the sander to shape it in any style you like for the back of your deer.

Now make a line here and sand down to the line which will become the platform for the neck.

Take your hand saw and saw off the disk ends of the Shaker pins

Now you have the four legs.

Using glue to attach the wooden candle cups to the peg end of the Shaker pins

This is the leg with the hoof

Using a small drill bit, drill four holes in the spots marked for the legs, You want to start with a small bit, then increase the size till the ends of the legs fit in.

Now you have the holes drilled

You can glue the legs into the holes

Then set it on all fours making sure it is even and doesn't rock, then let it dry.

Take the large sized wooden split egg and mark it as shown.

Using the sander to shape down to the lines and continue to shape it until you are happy with the tail.

This will be my little Flag tail

Take the small wooden egg and mark out places for the eyes.

Using the drum sanding bit for the Dremel carve and sand out shapes for the eyes

This is what I did to mine, you decide how much detail you want.

Now using the proper sized drill bit, make holes in the sides to fit the eyes into.

Resulting in something like this.

Use the Jig saw to cut the tongs into halves and design the look you want for your antlers.
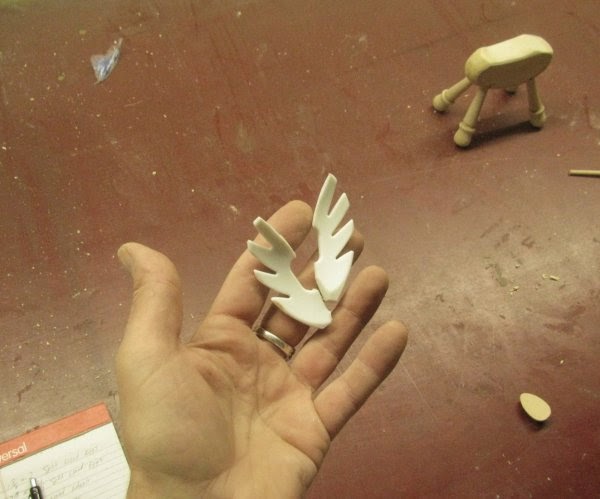
These will be mine.

Carefully making small holes in the bottoms to aid in gluing to the head.

Now make receiving holes in the top of the head for the antlers.

Cut small pieces of your wire to be used to attach the antlers.

Using your adhesive to attach the antlers into the holes.

Drill holes into the sides of the head behind the eyes for the ears to be attached.

Drill holes into the bottom part of the small split wooden eggs, two of them for the ears, and glue them on in a similar fashion as the antlers.

Here is mine from the front with the antlers and ears. You may choose to use a Pasta spoon for the antlers for more of a Moose look, or you may choose another method of antlers of your choice.

Screw the little eyelet's into the bottoms of the hoofs.

Cut the dowel to the size you need to accommodate the width with the wheels on, then incert them into the eyelet's.

Use the drill and proper sized bit to make a hole in the bottom of the head.

Incert a small piece of left over dowel into the hole and glue.

Glue the small wooden doll pin stand to the neck platform. Then drill a hole down through the center into the neck platform of the deer body.

Glue in the eyes.

Now you can glue the head onto the body, and glue the wheels onto the axles.

Drill hole into the bottom of the tail and to the back side rump of the deer body. Insert wire into the tail with glue.

Glue the tail onto the body.

Now your deer is ready to roll, and embellish and paint to your own taste! Good Luck and Merry Christmas! Make note the Reindeer that I picture below as a finished project has different antlers on it, they were cut from a plastic window hanging snowflake from Walmart, then warmed in an oven and bent to the shape, then adorned with Berries.


No comments:
Post a Comment